This is the Horde. Below are our Recipes. Thanks for sharing our Kitchen

Thursday, September 4, 2014

Honey Garlic Chicken - Slow Cooker. Insanely easy and delish

So I'm back in the kitchen for awhile.  Actually I go back to work next week for a few days and have all this stuff in my fridge that needs to be cooked, prepped or frozen.

The Mr. is away on business and is not a huge honey garlic fan but we all love it so I tossed in some chicken thighs and legs into the slow cooker.  Here is the easy part.


In a small bowl mix
1 cup of soy sauce (I use salt reduced)
A cup of Ketchup (yes...I can't believe I typed that either)
3 teaspoons of minced garlic
1/2 cup of honey
a sprinkle of dried basil

That's it.  Mix it up and pour over the chicken in the crockpot.  Set it on high for 5 hours.   Thicken the sauce with a little cornstarch just before serving.

I pulled the chicken out just prior to adding the cornstarch and removed all the bones and skin but that's up to you.  Serve over rice. (that was previously made and frozen in the last post!!)

Prep time: 5 minutes.  I recognize this is not the most glamorous food shot ever but we were hungry and forgot to take a plated pic.  :D     Pretend it's on a lovely china plate on a bed of wild rice.  


Edited to add:    I cooked up some more wild rice and divided all of this into individuals portions again and froze them.   Perfect!!!


BONUS

In addition to this I was hankering some scones.  I have a bunch of cubed ham and shredded cheese in the fridge.

Using My awesome Buttermilk Scone recipe, I added some ham and cheese to the mix before adding the buttermilk.  They are DELISH.  The kids loved them and snagged them for breakfast this morning.   I also made just a cheese version.  I sent a few of these to a fellow football mom who drove my lad to practise tonight and they were a big hit with the kids in the car too.

Tuesday, September 2, 2014

Back to School: Freezing sandwiches and Marathon cooking

I have been rather negligent on blog posting but I've not really stopped cooking.  I've been sewing alot, and life gets in the way of posting.

I did however just do a marathon weekend of cooking getting ready for Back to School.

I started a job last fall for the first time in many years.  I hated it and I quit....the nice thing about not actually needing a job is you don't have to stick around doing something you hate or more to the point working for someone you don't respect.    Water under the bridge.   That said...I've started another job part time that I am loving.  (I used to own my own company and I am now working part time for one of my old customers.  Creative and fun = perfect, I am not sure how long I will be needed but I'm happy to be along for the ride for now)   It's great for pin money and it feels good to be out of the house.

What is this leading to?  Well...lunches.   I had to get organized.  I started marathon cooking one weekend a month getting all the lunches ready as best possible so the kids could just grab and go in the morning.   I could do the same as could hubby if so inclined.    Boy have they grown fast.  I now have one in his final year of University, one starting college (out of town...sniff), a young lady starting highschool, and our youngest in his last year of middle school.  Time flies.

Shiny object alert....

Back to  my point.  Lunches and meals.   I have really avoided processed deli meats for a couple of years now as best possible.  I still love a great italian hard genoa salami (no innuendo...really),  but the rest?  Too much salt, nitrates and the like.   I had started cooking up chicken breasts, roasts of beef and pork and making sandwiches with them on a weekly basis.   I took it up a notch.

This takes some organization but it works beautifully once you get in the groove and it really does save a lot of time.  I try to get everyone helping out, be it shredding cheese, peeling apples or digging in and cooking with me.

This weekend for example.  We made.   40 Chicken Salad wraps,  25 Roast beef sandwiches, 36 Pizza poppers (my homemade version of a pizza pop),  15 servings of mac n cheese (thermos size), 15 meal size portions of lasanga (more...but they wanted to actually eat some that day....the nerve),   200 Meatballs, a double batch of beef stew, a double batch of spaghetti sauce (meat pasta sauce/ragu type)  3 chicken pot pies, 29 apple and blueberry crisps in jars.
 (in the photo above...about half way through cooking.  upper left: Chicken salad pinwheel wraps,  Upper right:  Pizza poppers and Mac n Cheese.   bottom right: roast beef n cheese, pizza poppers, and eventually some lasagnas, rice and such were added.   Stews are frozen in the plastic containers. (That however is the best gravy ever from a burger joint in my hometown of Sudbury Ontario, called Deluxe.  They make the most scrumptious Chicken on a bun you have ever had and my mom knows the owner so got me a gallon of gravy for my birthday so I could make my own at home....love it!!!)


Back on topic...
This takes a lot of prep and a big trip to Costco or the farmers market.   Note, most veggies don't freeze well in sandwiches so we cut them up and keep them in the fridge.  The kids grab what they want and put in seperate container to add to the sandwiches after defrosting.

Freezing sandwiches and lunches ahead of time is really easy and convenient.  They grab what they want and it defrosts by lunch time.  (don't use insulated bags though because they may not)

Ideas above are great for lunches.  As are meatball subs, pork sandwiches, and the like.  I've made chicken club (bacon and chicken...kids add tomato and lettuce at school), pulled pork (they didn't like those), tuna, as well as turkey.

Part of the trick is finding a good bread.  For sandwiches I use a light rye from Costco (Canada).  It works very well as it's a little hard to begin with so it doesn't get soggy.  I use stone ground tortilla wraps without issue.   There is also something called One bun Folded Flat bread that works fabulously for meatball subs.

Lets get to it shall we?

Process:

Roast chicken breasts however you like.  I honestly just toss them into the oven plain and cook them up.   Pop them in the food processor with a little carrot, green onion, and green pepper.   Grind them up.  Remove from processor and add mayo and a little dijon for some zip.    Spread on a tortilla wrap, place a slice of provolone cheese and roll them up like a pin wheel.  Cut in half and wrap in plastic wrap.  Pop them into zip lock freezer bags, label and date the bag.  Place in freezer.

Roast beef Sandwiches. 

Make a roast the night before and let stand in the fridge whole overnight.   Cut thinly.  I use a light rye for this and spread some mayo and a little dijon on the bread.  Layer the beef to whatever thickness you like and add what cheese you like.  I use either light swiss, or light havarti.  Wrap in plastic or in a sandwich bag.   again, place into a larger ziplock bag, label and freeze.     For the roast?  I personally make it rather easily.  In my dutch oven I place the roast, add about an inch of red wine (cheap wine is fine), coat the roast in dijon mustard, add some crushed peppercorns and some garlic, sliced onions and off to races we go.   Roast at 350 degrees until cooked to desired level.

Meatball "subs".   Really these are meatball, 1/2 flat breads...
I make my meatballs the same time as my sauce and let them cook in the sauce.  The meatballs absorb the flavour of the sauce and are tender delicious mouthfuls of yum.     Again...very basic.   Ground veal/beef.  an egg or two depending on how much you have and some breadcrumbs to bind.  The breadcrumbs help bind it all together and absorb the tomato sauce.   Toss them into your simmering meat sauce or tomato sauce and let cook for a couple of hours.

After they are cooked I just scoop out the meatballs and make the "subs"    The half flat breads are cut almost like a pita allowing you to put your mozzarella/provolone cheese in.  The meatballs and a little sauce.  Wrap and freeze.  These can get a little soggy so don't go heavy on the sauce.  You can use hoagie buns or whatever just note they can get soggy. 

Crisps in a Jar


I just take my standard apple crisp recipe or blueberry crisp, and instead of putting it all in one pan I split it into clean, sterilized mason jars.  I bake them in the jars and pop the tops on when they come out.  They do seal but I would advise freezing them.  I am experimenting on actually "preserving " this but as it stands right now the jury is out whether it is completely safe to do so.  As a result..I advise freezing them after they have cooled down.   I did actually just try a batch of water bathing preserving but I won't know the results for sometime so....use caution.    I also advise the same for breads/cakes in jars.   I often make banana bread and cakes in mason jars.  Again...just bake them in the jars and top them.  But do take caution and freeze them.  They are okay for a couple of weeks not frozen I think but why take a chance. (not that they actually last that long in this house)

Pizza Poppers.


My version of pizza pockets.    Roll out puff pastry as if for turnovers.   Spread, pizza sauce, cheese, pepperoni, mushrooms...whatever.   fold in like a triangle for a turnover and pinch.  Bake at 375 on a cookie sheet until golden brown.   cool completely and freeze.  You will note I did these in muffin tins.  DONT do that.  It did not work out well.  Tasty but soggy underside.  I pulled all these out and finished them on the cooling rack underneath in the oven


Hot meals:

For this I make my standard recipes and then once cooled divide them into individual portions and use my vacuum sealer.   I can honestly say the vacuum sealer has been one of my best investments.  Saves me a tonne of money.  Again...Mac n Cheese is my standard recipe.   Elbow noodles, some cubed cooked chicken, cauliflower and a teeny smidge of cayenne pepper to zip it up.  Sauce is a standard white sauce with cheddar cheese.   Mix it all up, place in a lasagna pan or casserole.  coat with some buttered breadcrumbs and shredded cheese and bake for 45 minutes at 350.   cool it down completely.  


About a cup and a bit fit into the small thermos so I divide it up and place into vacuum bags.  The kids just pull it out.  Heat it up in the bag in the microwave and pop it into a thermos for lunch.

Same thing is done for Lasagna's and Chicken Pot pie.   Stew and Potatoes I do a little differently.   I mash up potatoes with sour cream and cream cheese and scoop it into muffin tins.  I freeze it a little then pop each one into vacuum bag and freeze.  This makes for an easy add on to a dinner when running to football practise or dance class after school.  The stew I freeze in containers.   I've also made roast beef with gravy and individually sealed portions into bags for quick dinners as well.  Oh..RICE...rice freezes really well so freezing one cup portions in vacuum bags is also done.  The kids sometimes like that at lunch as well.

It is a lot of work for a weekend but if you are organized you can get it all done and then relax for a month. (or more)


Do any of you freeze lunches ahead.  Any more ideas?   I will continue to share as I move along and make more.  I'm sure I have more pics from last years adventures kicking around.

Thursday, January 24, 2013

Warm Scrumptious Apple Turnovers on a frigid winter's day

I recognize it's been ages since posting new recipes.  I have had a wonderful year of travel and focus on famly and the blog went a little by the way side.  

I am working hard to lose all the weight from quitting smoking (two years yesterday!!!)

That said there is always a little room for some sweets and today I could think of nothing better than comfort food on this very very cold day. (-30 Celcius).  

Last night I piddled about with some puff pastry pockets I had and while they were tasty they weren't quite right.  Today I decided on proper turnovers and experimented again.  To say they were a success would be an understatement.

Delicious.  So easy.

I started with a box of Tenderflake Puff Pastry.  I took half and rolled it out into a larger square on a floured surface.  I rolled it out to approx 9x9 square, and using my pizza cutter split into four equal squares.  I covered that with some plastic wrap until the filling was ready.  Alternatively you can do this step after making the filling

Ingredients for the filling. You can substitute whatever fruit you like into this. Blueberries would be divine as well.  I admit my measurements were closer to a little bit of this and a little bit of that but the following is pretty close

3 Large apples (I used Macintosh first go, and Honeycrisp the second time round)
approx 2/3-3/4 cup brown sugar 
1 tsp cinnamon
dash of lemon juice
dash of salt
approx 1tbsp cornstarch dissolved in 1 tbsp water
2 tbsp butter
1 egg white lightly beaten

Peel the apples and dice.
Place the butter in a medium sized sauce pan and melt until bubbly.  Add the apples and lemon juice, stir for approx 2-3 minutes.
Add the sugar and cinnamon and cook for approx 3 minutes again until the apples are soft 
Stir in the dissolved cornstarch and remove from heat as soon as it starts to thicken.   The mixture should thicken up nicely while being stirred off the element.  


Spoon the mixture into the prepared squares.

Using a pastry brush (or fingers) brush some egg white onto the edges and pinch closed into a triangle. (Little tip...I closed the less filled side first then held them up and let the filling slide down a bit to close the final edge)

 
 Brush egg white onto edges and top of pastries

Place in a preheated oven of 400 F for approx 22-25 minutes.  You can poke some slits into the tops to release steam if you like.  I did and found it helped to keep them from leaking.
Remove and let cool. (As hard as it may be try not to eat straight away or you will have a burned mouth)

I made a glaze icing out of a tablespoon of skim milk and stirred in confectioner's sugar (icing sugar) until it was the consistency I wanted.    


Wednesday, January 18, 2012

Healthy Delicious Hoisin and Garlic Burgers

It's a new year and I'm totally comitted to losing all of the weight I gained by quitting smoking a year ago (It will be a year in 5 days...YAY me).   I feel great having quit but I am miserable with the weight gain.

I have started Hip Hop Abs to kick start a workout routine, plus we got a puppy and he is wonderful for walking incentive.

Without further adieu the recipe.   WOW!!  Once again I have been following Rose Reisman's recipe's and this one is from her Complete Light Kitchen book.   It is FANTASTIC!!!  The kids were gaga over them.

These are made as sliders and based on a serving of two mini burgers there are 264Calories in the serving.    The only thing I did differently was I made them on my indoor grill iron and omitted the sesame oil/hoisin sauce brushing on.

Ingredients.
1 lb extra lean ground beef
1/4 cup breadcrumbs (I used panko)
1/4 cup chopped green onions
2 tbsp hoisin sauce
2 tsp minced fresh garlic
1 tsp fresh ginger
1 egg

Preheat you indoor grill or bbq (if warm weather).  We are mid winter here at the moment so going outside to grill not up there on the priority levels.

Combine all of the ingredients in a mixing bowl.   I always like to mix up burger combos in my kitchenaid mixer to ensure all the ingredients are properly infused.

BBQ, use indoor grill, or bake on a cookie sheet for 10-15 minutes until no longer pink.   Serve on mini buns.   I topped them with sautéed shitake mushrooms and it was scrumptious.  You could top with sautéed onions as well.


Saturday, November 26, 2011

A Football Cake for a Football Party


I recognize I've not been around of late.  I went on vacation to Portugal and I've been in a major crocheting frenzy of late, making gifts for Christmas.

All of the above plus my new role of team momanager of my youngest man's football team.  It has been a blast actually.  My little guy has fallen in love with Football!  who knew?

Our little motley crew of players have done pretty well.  We made it to the championship game.  While we didn't take the title we gave the opposing team a workout and made them fight for the win.  I was really proud of little guys. (all 10 year olds)

I promised the team at half time last week that if they played their hearts out 2nd half we'd have a party.  Tomorrow is the day.


My little guy helped me decorate this one.  He did the football field.   All of this is real cake.  Football is pound cake (two of them carved into shape)


Thursday, July 28, 2011

Sour Cream Pancakes. A Bed and Breakfast treat

My mum and dad run a B&B  here in Northern Ontario during the summer months.  Our family cottage built by my Grandad and added onto over the decades is now host to families and couples from around the world.


This recipe has become one of the favorites of all guests, children and adults alike.   It originates from my mum's pre B&B days when she ran a charity.  One of the fundraisers for the charity was a cookbook.  I don't know who contributed this one but it is fantastic.   Substitute plain yogurt for sour cream if you don't have the sour cream.  I have also changed the original to use buttermilk instead of regular milk.  (we are buttermilk fans in our house).  Add some fresh fruit if desired.  The possibilities are endless.  Mum has been known to add chocolate chips for a special treat.

You can also mix the dry ingredients, pre prepped and stored in zip bags for faster prep on busy mornings.

Ingredients
1 cup flour
1 tbsp baking powder
1 tbsp sugar
1/4 tsp salt

1 egg
2 tbsp sour cream, heaping  (or plain yogurt)
1 cup buttermilk
2 tbsp melted butter

Sift together dry ingredients.  Mix egg, milk and sourcream.  Pour over dry ingredients, add the melted butter and mix.   Spray a hot skillet with Pam cooking spray and cook.  Makes approx 12 pancakes (silver dollar size).

They were delicious

Friday, July 8, 2011

Harry Potter Sorting Hat Cake (aka 10th birthday cake)

Yet again my little guy has a birthday.  Since we didn't get to do a fun cake for my daughter in May or my teenager in June I actually had time to bake a cake today for my little man's 10th birthday on Sunday.

Harry Potter was again a theme and this time a sorting hat was to be made.  I had zero clue how to approach this so I basically started winging it.  I made 6 layers of cake (used 5, plus a couple of ramekins to make the tip, and a giant marshmallow).   Buttercream icing between the layers and chocolate fondant covers it all.

This went significantly more smoothly than I anticipated actually.  I am grateful the hat is old and mishappen as my fondant ability is not great so it all kind of works.   All in it took me about an hour and a bit to ice, carve and finish up.

Carving the cakes


Dirty layer of buttercream for under the fondant

Fondant layered on and molded as best possible

A few embellishments for our little Gryffindor


One happy little man

Thursday, May 26, 2011

Chicken with Cranberry Almond, Havarti Stuffing

Once again we have another delicious chicken recipe.  The original (Rose Reisman) recipe called for Chicken Supreme with skin but I altered it to a light breading instead.  Some of the measurements are altered as the original recipe served 4 and I need it for 6.

My youngest lad has lately become somewhat fascinated with all things cranberry.  He wanted me to make this one last night but I opted for the Tomato/Olive Chicken combo in yesterday's post instead.

Tonight I gave in and made this one and it was absolutely delicious.  The sauce is delightful and the chicken combined with the stuffing is perfect.  If only they made a "light" white wine with few calories....oh to dream.

Again, easy to prepare, and fast.   All in about 45 minutes (with kids running up to the market to pick up ingredients I had run out of).   These measurements were to serve 6.

Ingredients
1.5 lbs boneless skinless chicken breasts (six breasts)
1/4 cup bread crumbs
1 egg
1/4 cup skim milk

Stuffing
3/4 cup dried cranberries
1/3 cup toasted almonds
1/2 tsp cinnamon
2 tsp olive oil
3/4 cup shredded light havarti cheese

Sauce
1/4 cup maple syrup
1/4 cup thawed concentrated orange juice
1 tbsp honey
1 tbsp low sodium soy sauce
2 tsp sesame oil
1 1/2 tsp Dijon Mustard
1 tsp finely chopped garlic
1 1/2 tsp cornstarch

Garnish
fresh chopped parsley

Preheat the oven to 400 degrees F
Make a horizontal slit in each piece of chicken to form a pocket for the stuffing, making sure not to slice all the way through.

To make the stuffing, in a food processor, chop the cranberries and almonds.  Add the cinnamon and olive oil and finally havarti and process for a minute or so.

Stuff into the chicken breasts and secure with toothpicks.

In a small bowl combine the egg and milk and scramble well. Dip each chicken piece in to coat and then coat with breadcrumbs

Lights coat a large non stick skillet with cooking spray and set over medium high heat.  Lightly coat all of the breaded chicken with cooking spray.   Cook for approx 3 minutes on each side of chicken until golden brown and transfer to a foil lined cookie sheet.  (spray sheet with cooking spray).

Place in oven between 20-30 minutes until an interior temp of 165 F is reached.

Meanwhile prepare the sauce by whisking the maple syrup, orange juice,  honey, soy sauce, garlic, sesame oil, and Dijon together in a small saucepan.  Add the cornstarch and whisk well.  Bring to a boil reduce the heat and simmer for about a minute until just slightly thickened.  Spoon over the cooked chicken.  (It is delicious over rice as well)

Wednesday, May 25, 2011

Chicken with Tomato, Three Cheeses, Olives

This lighter fare kick we are on has been wonderful but dang....I love breaded food.  I can't tell you how much I love fried breaded chicken, fried breaded pork chops, chicken wings, oh and veal cutlets...oh how I love an artery hardening veal cutlet with a sprinkle of lemon juice....heaven.

It's been a stressful week.  I had to fly up north to care for my Mother in Law (she is fine).  My daughter was having an issue that was best dealt with by me so I flew her up with me (happy Birthday honey), and we reset the gardens all weekend.  It was a week of trying to stay light on the fly so to speak.  That said I needed some comfort food tonight.

Anyhow...true to the spirit of keeping it light and trying to lose weight.   Woohoo (I have lost a little over 4 lbs now).  This is a lightened up version.   I can't tell you how good this recipe was.  It turned out far better than I thought it would taste wise.  It was scrumptious and the kids all wanted 2nds.
 
I should note.  This recipe took about 1/2 hour from start to finish.   Quick and delish

I got my inspiration from Rose Reismans' Family Favorites cookbook.  I changed the cheese types, tomato variety and olives to suit our own tastes.  The original recipe called for Havarti, Goat Cheese, and Parmesan, plum tomatoes, and black olives.  I used Asiago, vine tomatoes, and green olives with the little red pimentos in them.

It was fantastic!!   Without further adieu.

Ingredients: (serves 6)
1.5 lbs boneless, skinless chicken breast
1 egg
2tbsp skim milk
3/4 cup breadcrumbs
2 tsp vegetable oil
1 1/2 cup diced vine or plum tomatoes
1/2 cup shredded asiago
1/4 cup crumbled goat cheese
2 tbsp grated parmesan cheese
1/4 cup chopped green olives
1 tsp chopped garlic
1 tsp dried basil
3 tbsp chopped basil fresh
2 tsp vegetable oil

Preheat the oven to 425 degrees F.  Lightly coat a 9 x 13 casserole dish with cooking spray.
Pound chicken to 1/2 inch thickness
Beat the egg and milk together.  Dip each chicken piece into the mixture and then coat lightly with breadcrumbs on a seperate plate.
Lightly coat a non stick skillet with cooking spray, add the oil and place over medium high heat.   Cook each piece of chicken until browned and almost cooked through (approx 3 minutes per side).   Transfer to the casserole dish.
Combine the tomatoes, asiago, goat cheese, parmesan, olives, garlic, and dried basil in a bowl.   Spoon over the chicken.  Cover and bake for 10 minutes or until the cheese melts and the chicken is cooked through. (internal temp of 165 F).   Garnish with fresh basil and serve with vegetables.     After the 10 minutes remove the cover and bake an additional 3 minutes.

This one is sure to please.

Chicken breaded.


After browning in the skillet


Tomato and Cheese mixture added

Yummy out of the oven

Monday, April 25, 2011

Ravioli Caprese Lightened up. (Chicken and Basil Ravioli)

One of our favorite recipes is Ravioli Caprese from Giada's Everyday Italian.  It's a wonderfully light tasting recipe.  It is however not that light calorie and fat wise so I wanted to try "lightening it up" tonight.


What resulted was a delightful surprise.  Minimal difference in flavour and even lighter tasting.

We used Wonton wrappers for this recipe instead of making the dough from scratch this time and I used light ricotta cheese and a broiled chicken breast as opposed to rotisserie from the store as in the original recipe.

While not big changes it was enough to lighten up the fat content and reduce the calories a bit.

The original recipe is posted HERE.    My changes are as follows.  As always my portions are to feed a family of six (plus a neighbour child tonight who begged to stay after seeing them made)

You can always take these portions and freeze extras on a cookie sheet then place them in a ziploc bag in the freezer to make a quick and easy dinner.  Halving the recipe works too.  I use the original measurements for the sauce without doubling.

Ingredients

Filling:
1 tub Light Ricotta Cheese
2 eggs
approx 1 1/2 cup shredded cooked chicken breast (use a processor to shred it).  This equates to about 1 cooked chicken breast
1/2 cup grated parmesan
4 tbsp chopped fresh basil
1/2 tsp salt
grated ground pepper to taste

Sauce:
3 tablespoons extra virgin olive oil
3 tablespoons chopped fresh basil
2 tsp lemon zest
1/2 tsp salt
1/4 tsp fresh ground pepper

Wrappers:  One 220gram package of wonton wrappers.  (approx 75 wrappers)

For the Filling:   Combine all the ingredients in a medium bown and stir to combine.  I use my kitchenaid mixer to combine them all well.

Place the wrappers working with about 12 at a time on a cookie sheet lined with parchment paper.  Have a small bowl of water and pastry brush nearby.

Place approx 1 tsp (a smidgeon more.  I use a small cookie scooper) into the center of each of the wonton wrappers.
Use the pastry brush to lightly brush water along two edges of the wrapper and fold to create a triangle.  press closed and set aside on a seperate cookie sheet until ready to use.

To make the sauce, simply place the ingredients into a skillet and heat the sauce on low.

Once all the wrappers are filled  have a pot of low boil water ready.  Place about half the wontons in the water and let low boil until floating and ready (about 3-4 minutes).   Drain the wontons and place in the skillet with the sauce, lightly coating before removing to serving dish.  Repeat with the balance of the wontons.

The result is delightful and significantly less work than making the dough by hand as well.  This took me about an hour from start to finish.   Making the dough rolling it out etc, generally takes me about 2-3 hours to make this recipe.

Light Cinnamon Crepes with Fruit and Cheese. Scrumptious

We had the pleasure of having my parents here for Easter weekend this year.  This is the first time in 15 years that we've been able to spend Easter together so I was thrilled as were the kids.   Since we don't have them here very often I wanted to make a delicious brunch for them.  Of course we are still trying to stay "light" and I worked through some recipes lightening them up.  In addition to the crepes we also made a Chicken Spinach Frittata.  Recipe here

These were absolutely delicious!!!  I got to test my new crepe pan and play in the kitchen.  The filling light and scrumptious.  Fresh fruit finishes it up beautifully...  Ricotta cheese is spectacular with fresh fruit on it's own.  Add in a little crepe and it pushes it over to top in goodness.


Crepes. (makes approx 15)

These can be made a day ahead of time.  Everytime I've made crepes the first one always goes caplooey so I just toss the first one (actually one of the kids gladly accept it to taste test. )  You can cut the recipe by 3rds to reduce quantity of crepes

1 1/4 cup all purpose flour
4 1/2 Tbsp granulated sugar
3 pinches of salt
2 1/4 cup buttermilk
6 tsp vegetable oil
3 large eggs (or 3/4 cups liquid egg replacement)
1/2 tsp cinnamon

Filling
1 Tub Light ricotta cheese
2 oz light cream cheese (about 1/2 bar)
2 tbsp sugar
1 tbsp lemon juice
1 1/2 tsp vanilla extract
3 tbsp pure maple syrup
3 cups of fresh fruit   (strawberries, banana, blueberries, raspberries, etc)


To make the crepes.
Combine the dry ingredients and mix well, set aside
In a seperate bowl combine the milk, egg, and oil.   With an electric mixer add the dry ingredients to the wet mixing gradually until smooth and combined.   Cover and refridgerate for 30 minutes

Lightly coat a non stick skillet or crepe pan with cooking spray and set over medium heat.  Using approx 1/4 cup of the batter, pour into the pan and tilt in all directions so the batter covers the pan.   Cook for approx 1 minute and lift the edges with a spatula to test.  Flip when the bottom is lightly browned.  I always use my silicone icing knife and a spatula to flip.  I am not a flipping master.  Set the crepes aside.   I use parchment paper to seperate the crepes.  I have tried plastic wrap (they get stuck together and hard to seperate the plastic),  wax paper (just doesn't work, paper gets soggy) and have ended with parchment paper being the best solution.   


For the filling, combine the ricotta, cream cheese, sugar, lemon juice and vanilla in a bowl, mixing with electric mixer until well combined.  Add the maple syrup and combine well.
Fold in half of the mixed berries gently.

To assemble, spread approx 1/4 cup (maybe a little more) of the filling onto each crepe and roll up.  Lightly coat a large non stick skillet with cooking spray over medium heat.  Brown the crepe on all sides for about two minutes.  Serve with the balance of berries.

Spinach Chicken Frittata

Frittatas are one of those easy breakfast items that let you use up all kinds of leftovers in the fridge.  I love frittatas.  They are nutritious and delicious.   You can generally use whatever you want in them after the basic eggs/cream combo to create your own unique versions.

I always have cooked chicken breasts in the fridge.  I love having them available for a quick lunch, to toss in salads, or make a quick meal.   This time instead of using heavy cream in the recipe to lighten it up I used 2% evaporated milk and it worked perfectly.  (next time I might even try evaporated skim milk)

Just as a note.  I don't measure any of this while I'm making other than the eggs and evaporated milk everything else is pretty much whatever I have on hand.

Ingredients

1 cooked chicken breast cut in small cubes
12 eggs
1/2 cup 2% evaporated milk
1/2 cup finely chopped onions
1 cup chopped fresh spinach
1 cup chopped brocolli (small)
1/2 red pepper chopped.
1 cup shredded cheese (your choice, sometimes I use goat cheese, feta, mozza, cheddar)

Beat the eggs and milk until well "scrambled".  Add in all the other ingredients and mix well.

Pour into a  greased 10-12 inch round oven proof dish (can be a skillet)  I use an oven proof flan dish.  I generally spray the pan with cooking spray.  Sprinkle some of the shredded cheese over the top of the mixture.


Bake in a preheated oven at 350 degrees F, for approx 45 minutes.   Remove from oven and let sit for five minutes before serving.   This feeds my entire family with leftovers.  Yesterday I made it for 8 and we still had leftovers.

Friday, April 22, 2011

Easy Creamy Lemon Meringue Pie


Who says low fat has to taste badly?    Today was a major cooking feast in the kitchen using up produce and meat in the fridge.  We have cream of broccoli soup, cream of cauliflower and carrot soup, (both made with low fat condensed milk, vs cream) beef stew, low fat mac and cheese and we needed to add a little sweet to our lives today.

I found a lower fat creamy version of Lemon Meringue Pie on Rose Reiman's http://www.theartoflivingwell.ca/  website this afternoon.  

My daughter's little friend showed up and asked if she could help in the kitchen so we went at it.  This recipe is very easy.  My young ladies learned how to seperate egg yolks and whites, how to whip egg whites into yummy meringue (which they say is like goopy marshmallow "stuff"), zest a lemon and hand squeeze the juices. 

This recipe took very little time to make and while we haven't tastes the finished product quite yet, there were lots of little fingers testing the filling/meringue and base along the way.  Numberous thumbs up were achieved.

From the filling it is almost more like my Creamy Key Lime Pie  but I suspect lower in fats.  I was tempted to make it without the meringue as I'm not a huge meringue fan but given the first kick at the can so to speak, we made as directed.

Crust:
1 1/2 cups vanilla wafer crumbs (I used graham wafer crumbs)
2 tbsp water
1 tbsp vegetable oil

Filling
1 can + 2/3 cup low fat sweetened condensed milk
1 tbsp lemon zest
1/2 cup lemon juice (fresh squeezed)
3 egg yolks (saving the whites)

Meringue
3 egg whites
2/3 cup granulated sugar
1/8 tsp cream of tartar
3 tbsp water

Preheat the oven to 350 degrees F.  Lightly coat a 9 inch pie pan with cooking spray (I didn't do this)
To make the crust simply combine the crumbs with the water and oil in a small bowl.  Pat into the pie pan along the sides and bottom

For the filling, comine the sweetened condensed milk, lemon zest, lemon juice and egg yolks until smooth and combined.  Let it sit for 10 minutes until it thickens a bit.   Pour into the pie pan and bake for 20 minutes or just until the mixture is set.

While the pie is baking make the meringue.   Combine the egg whites, sugar, cream of tartar, and water in a mixing bowl.   Beat on highest setting until stiff peaks form (about 7 minutes).   Spread over the lemon filling immediately upon removing the pie from the oven.

Increase the oven temp to 375 degrees F and bake for 10 minutes until just lightly browned.  Chill until cold and cut into 14 small slices.  

Yes...SMALL slices.  I'm learning it's not necessarily what I'm eating but the portion size of said foods.  We are definitely "lightening" up our dishes with some easy alternative ingredients  but really it's monitoring portion controls.

I don't really need large portions of food so on that front I'm lucky.   I just needed a little bit of tweeking.

Thursday, April 21, 2011

Mediterranean Burgers with Feta Cheese


Day 3 of healthy eating with another winning recipe from Rose Reisman's http://www.theartoflivingwell.ca/ website.

Tonight I actually made a variety of dishes including a "light" baked macaroni and cheese, and cream of broccoli soup.

I'm going to concentrate on the burgers though as they were exquisite!!!  The kids could not get enough of them.  I used approx 2 lbs of ground beef and doubled the recipe for my family.  I made the patties smaller to yield approx 18 patties

Absolutely no need to have a bun although my oldest told me a small fresh bakery dinner roll made was tasty with it as well.

Again under 300 calories and I can't even begin to describe how good these patties were.

BURGERS

1 lb extra-lean ground beef
1 egg
1 tsp dried basil  (I used fresh Basil (about 1 tbsp) and (1/2 tsp) oregano)
1/2 tsp dried oregano
3 Tbsp seasoned dry breadcrumbs
3 Tbsp ketchup
2 tsp finely chopped garlic
1/4 cup finely chopped onion
1/4 cup crumbled feta cheese (about 1 oz)

SAUCE
1/4 cup crumbled feta cheese (about 1 oz)
1/4 cup light cream cheese (about 2 oz), softened
3 Tbsp low-fat plain yogurt (or sour cream)
1/2 tsp finely chopped garlic
1 Tbsp lemon juice
1 Tbsp water (I omitted the water)
1/2 tsp dried basil  (I used fresh basil)

To make the burgers, combine the ground beef, egg, dried basil and oregano, breadcrumbs, ketchup, garlic, onion and feta in a large bowl and shape into 4 burger patties. Grill or sauté in a pan lightly coated with cooking spray. Cook on 1 side for 7 minutes, then turn over and cook 3 to 5 more minutes or just until beef is done.  I grilled mine on the bbq.

Combine all the sauce ingredients in a food processor and purée until smooth.  I simply used a hand blender

Tuesday, April 19, 2011

Orange Glazed Pork Tenderloin, Cranberry stuffing

As we venture into the lighter fare these days in my home here is another fantastic dish.

My 9 year old LOVED it!!   I  found this on The Art of Living well website.  I have been working through some of her recipes as I try to shed some of the weight gained since quitting smoking.  If you get a chance you really should  check out her website.  It is quite amazing.  Full of healthy, delicious recipes, smart alternatives to restaurant foods while eating out, and a positive outlook for healthy living. 

I recognize I need to diet, but I hate that word and I love food.  By that I mean flavourful food, not necessarily food in large quantities.  From my experiments with some of Rose's recipes thus far, healthy doesn't have to mean bland.

This recipe was delicious.  Under 300 calories per serving. (This recipe serves 6). 

Simple to make and quick.   It took me about 10 minutes to prep it and approx 1/2 hour to make.  It was served with sushi rice (1/2 cup)  and steamed asperagus.  

My one note about this recipe.  The glaze is amazing but strong!  A teeny tiny bit will do quite nicely.  The little of bit of orange with the cranberry is fantastic but too much can be overpowering.

Meat
1 1/2 lb pork tenderloin, butterflied

STUFFING
2/3 cup dried cranberries
1/3 cup toasted walnuts
1/2 tsp cinnamon
pinch of ground cloves
2 tsp walnut (or olive) oil
1 oz diced brie

GLAZE
2 Tbsp orange juice concentrate
2 Tbsp red currant or black currant jelly
1 tsp balsamic vinegar
1 tsp olive oil
1 tsp orange zest
1/2 tsp finely chopped garlic

GARNISH (OPTIONAL)
3 Tbsp chopped parsley


1.Preheat the oven to 375°F. Line a baking sheet with foil lightly coated with cooking spray.

2.To make the stuffing, combine the cranberries, walnuts, cinnamon, cloves and walnut oil in the bowl of a small food processor. Pulse on and off until the mixture is crumbly. Add the diced brie and pulse once or twice, just to combine.   I didn't use my processor for this step.  I chopped the cranberries and used some coursely ground walnuts, chopped the brie and mixed it all well.

3.Open the pork loin like a book and stuff with the fruit and nut stuffing. (If you would like to make this easier to roll, first pound the pork to a 1/4-inch thickness before stuffing.)I just cut mine. Secure with either kitchen string or toothpicks. Set a large, nonstick grill pan or skillet lightly coated with cooking spray over medium-high heat and sear until browned on all sides, about 2 or 3 minutes on each side. Place on the baking sheet and bake for about 20 minutes or until cooked to medium (until the meat reaches an internal temperature of 145°F). Let rest for about 10 minutes before slicing.  I am not sure why so many recipes call for non stick pans but I don't own any anymore so I simply use a light coat of Pam in my steel skillets.

4.Meanwhile, prepare the glaze by combining the orange juice concentrate, jelly, vinegar, olive oil, orange zest and garlic in a small saucepan. Set over medium heat for 1 minute and drizzle over the sliced pork. Garnish with parsley.

For nutritional information and more information visit http://www.theartoflivingwell.ca/  you can also follow Rose on Facebook at  https://www.facebook.com/rosereisman

Friday, April 15, 2011

Harry Potter Movie Night Magical Dinner Theme

Harry Potter and the Deathly Hallows Part 1 was released today on DVD.   New  Harry releases are always exciting days here in our household.

What happens when you have a mom who loves the books and movies as much as her kids?   A day of fun, frivolity and magical adventures in the kitchen.

We start the festivities with Luna Lovegood's Pie (aka Shepard's Pie).  (Recipes at the end of the post)

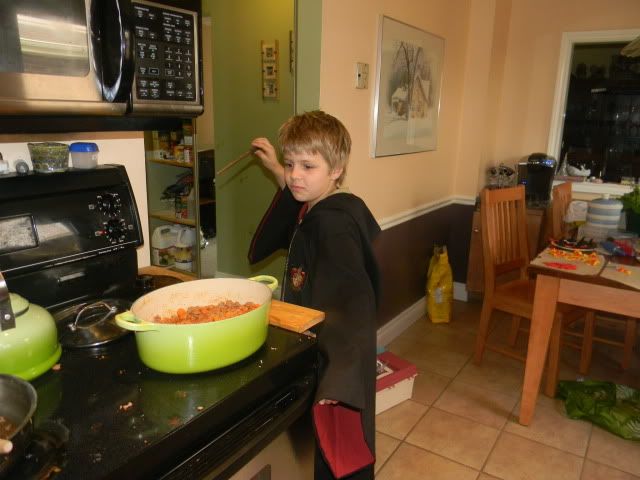
Here we have a young wizard casting a spell on mom's stove because our house elf has disappeared


Of course  no magical meal is complete without desserts.  Our young witch is casting an enchantment charm on these today


A beverage is a must indeed.   Butterbeers all around.


A fine evening ahead for the lot of us.

Shepard's Pie Recipe

3-4 lbs extra lean ground beef
1 large onion (chopped finely)
2 carrots sliced
1/2 bag of frozen corn
1 box sodium reduced beef broth
1 can tomato paste
pepper to taste
a few dashes of worchestire sauce

approx 8 new potatoes, boiled, mashed. (I always add 1/2 block of cream cheese to my mashed potatoes)

Brown the meat and onions in a large skillet or dutch oven.  Add the box of beef broth, worchesterire and about 3/4 can of tomato paste, as well as the carrots.   Let simmer for about an hour.

Cover with the mashed potatoes and bake for approx 45 minutes to one hour in the oven at 350 F.


Cupcakes.  Use your favorite cupcake recipe and any of the buttercream icing recipes listed here in the blog.   I made the scarves, hats and brooms out of premade fondant today.  (normally I make it on my own but got to it a little late today)

Butter beer.   Lots of labels available online for downloads.   To make the butter beer.

Clear Cream soda and butterscotch flavor to taste.  It's really that simple.   Grown up versions of butterbeer.   Clear cream soda and butterscotch schnapps.

For some fun with the kids and an extra special movie night ahead.
Related Posts Plugin for WordPress, Blogger...