This is the Horde. Below are our Recipes. Thanks for sharing our Kitchen

Friday, June 5, 2009

Wilton’s Buttercream Icing - Basic

Technorati Tags: ,

Buttercream Icing (this is Wiltons recipe, I substitute cream for milk, use pure vanilla extract, and add a few tablespoons of clear corn syrup for more even spreading.

Our Buttercream Icing recipe is perfect for spreading or decorating. Follow our instructions to make it the ideal consistency you need.

Source: 2003 Yearbook

Ingredients:
  • 1/2 cup solid vegetable shortening
  • 1/2 cup (1 stick) butter or margarine softened
  • 1 teaspoon clear vanilla extract
  • 4 cups sifted confectioners' sugar (approximately 1 lb.)
  • 2 tablespoons milk

Makes: About 3 cups of icing.

Instructions

In large bowl, cream shortening and butter with electric mixer. Add vanilla. Gradually add sugar, one cup at a time, beating well on medium speed. Scrape sides and bottom of bowl often. When all sugar has been mixed in, icing will appear dry. Add milk and beat at medium speed until light and fluffy. Keep bowl covered with a damp cloth until ready to use.

For best results, keep icing bowl in refrigerator when not in use. Refrigerated in an airtight container, this icing can be stored 2 weeks. Rewhip before using.

For thin (spreading) consistency icing, add 2 tablespoons light corn syrup, water or milk.

For Pure White Icing (stiff consistency), omit butter; substitute an additional 1/2 cup shortening for butter and add 1/2 teaspoon No-Color Butter Flavor. Add up to 4 tablespoons light corn syrup, water or milk to thin for icing cakes.

NOTE: Changes in Wilton's traditional recipes have been made due to Trans Fat Free Shortening replacing Hydrogenated Shortening.

Wednesday, June 3, 2009

Penne with Turkey and Wild Mushrooms

There are days when going to the grocery store can be quite a treat. Our local big box type grocer generally always has someone cooking up some recipe using President's Choice products of some sort or pushing another brand sold in the store.

What I like is the recent change of actually have properly prepared food and not fast precooked frozen samples ready.

I've picked up many samples recently and this one was just delightful. I have no source for this recipe as the chef just handed me a blank page with the recipe on it. The best thing I can do is source "Loblaws in house chef" as the creator of this recipe. I tried to look for it on their website but no luck.

This one is quite good. It's light, low fat etc. Yes it has carbs but I've learned to embrace carbs (in moderation for daily intake of course). Try to stick only fresh herbs if you can but it's fine with dried as well.

Penne with Turkey and Wild Mushrooms

1 pkg PC Slendido Penne Pasta
4 tbsp Extra virgin olive oil
1 red bell pepper, diced
1 tbsp chopped fresh thyme (or 1 1/2 tsp dried)
2 large garlic cloves, chopped
1 tsp dried chili flakes
1 1/4 lb ground turkey
1 lb assorted fresh mushrooms, (cremini, stemmed shitake, portabello, oyster etc) sliced
5 green onions, chopped
1 1/3 cup low sodium chicken stock
2 1/2 cups freshly grated Parmesan Reggiano cheese
1/2 dry white wine

Cook pasta in a large pot of boiling salted water until tender but still firm to bite, stirring occasionally to prevent sticking. Drain very well and set aside.

Meanwhile, heat 2 tablespoons of olive oil in a heavy large pot over medium-high heat. Add the bell pepper, thyme, garlic and crushed red pepper. Saute for 2 minutes.
Add ground turkey to pot. cook turkey until browned, breaking up the turkey with the back of a fork, (about 5 minutes)
Using a slotted spoon, transfer turkey mixture to large bowl. Discard any fat, deglaze pan with wine and reduce.

Pour liquid over turkey mixture.

Heat remaining 2 tbsp of oil in the same pot over medium-high heat. Add mushrooms and green onions and saute until mushrooms are teer and brown, about 6 minutes. Add turkey mixture and stock. Reduce stock by 1/4 volume.

Add pasta and cook until sauce thickens enough to coat the pasta, tossing often. (approx 3 minutes). Add Parmesan Cheese, season to taste with salt and pepper and serve.

It's a very good recipe. If you prepare the meat and veggies while the pasta is cooking it generally takes less than 1/2 hour to prepare.

Try this one out and let me know how it works out for you. (Please note. I don't have a pic of the one I made but found something similar on the food network for an image)

Tuesday, June 2, 2009

Creamy Cheesy Chicken Pot Pie

This one has turned into my 14 year olds favorite "comfort" food dinner. It is scrumptiously yummy, and is a good way to use up vegetables in the refrigerator.

I use this as a base and adjust the veggies to whatever I have sitting in the fridge. You can do this recipe two different ways. One with biscuits on top in a casserole, or you can use deep dish prepared frozen pie shells and make them as a pie. Either way they are fantastic.

Ingredients:
500 grams of chopped cooked chicken breast (cut them fairly small)
1/2 cup chopped onion (I use shallots)
2 tbsp shredded carrots
2 tbsp diced celery
1 cup chopped broccoli
1/2 tsp salt
2 cups cream of chicken soup (or cream of mushroom soup)
1/2 cup grated old cheddar
1/3 cup cream cheese
1/4 cup grated parmesan

For biscuit topping:
1 egg
1 cup bisquick
1/2 cup skimmed milk
1 tbsp vegetable oil

I'm going to type the instructions exactly as originally given but I have made substantial changes to it over time.

Put a dab of oil into a large pan. Saute the onions and celery until soft. When that is done add 2 cups of soup plus one cup of milk to the pan and mix well until heated. Add the cheeses over low heat until it's all melted and mix well. Stir in the remaining vegetables and pour into a casserole dish.

Set Aside.

In a large measuring cup combine egg, oil and milk. Give it a little scramble and add to the Bisquick mix in a seperate bowl, until smooth and well combined.

Spoon batter over the chicken mixture in the casserole dish. Bake uncovered for 1/2 hour to 45 minutes in oven at 375 degrees.

If using pie shells, pour the chicken mixture into the pie shell (you may need two shells depending on the size). Cover mixture with second shell by inverting the frozen shell over the mixture and leaving it there for a second. The heat from the chicken mixture will defrost the pie shell and it should slip right out of the foil. Fit it to the underside and pinch the edges closed. Be sure to poke some holes in the top to release moisture. Bake at 375 for 45 minutes.

So, how does my creation differ? Not much actually. The soup, cheeses and milk remain constant but I tend to use two full cans of soup and adjust the milk accordingly. I use wayyyy more veggies and chicken than called for. I have lots of kids so it must be done. I use a minimum of two chicken breasts, and whatever veggies I have kicking around (plus the onion...the onion is a must). I have tossed cauliflour in, peas, carrots, corn, broccoli into it. Sometimes a couple, sometimes all of them. Experiment with different concoctions to see what you can come up with. I have to admit, the cream chicken soup works better than the cream of mushroom but in a pinch cream of mushroom will do.

Monday, June 1, 2009

Hopscotch Brownies (Caramel/Butterscotch Brownies)

I began my love of the kitchen as a child. My mother would let me help her make cookies, and cakes and such. When I was about 10, friends from Ireland came to visit for the summer. With them they brought me a cookbook called "The Kitchen Wizard", complete with matching apron. A treasure of a book full of fun recipes for kids. I made sponge toffee, pull taffy, hard candies, all kinds of treats. It was a challenge though as all the measurements were in metric/grams. Managed to convert my favorites and now fortunately have a conversion scale in the kitchen.
Clearing out some old boxes I found my beloved childhood recipe book. It brought back many fond memories of the hours spent in the kitchen with my mom and friends.

This was always one of my favorite recipes. It has actually been doubled as my son has it to memory and dictated it to me. He has taken over the Butterscotch Brownie tradition in the house and has mastered it. If you wish a smaller batch cut the recipe in half.
By the way, he has announced I must credit him with mastering the perfect brownie, so I shall, as he does indeed make a perfect butterscotch brownie.

Butterscotch Brownies Recipe

1/2 cup butter
2 cups light brown sugar
1 teaspoon vanilla extract
2 eggs (large)
1 1/2 cups white flour
2 teaspoons baking powder
1/2 teaspoon salt
1/2 cup crushed pecans (optional)

Melt butter in a medium saucepan at medium.

Enter in the brown sugar and stir the mixture until all the brown sugar becomes wet from the melted butter.

Put the eggs into the substance with the vanilla extract and continue to stir until neither are visible.

Add the flour, baking powder, and salt into the mixture and stir until the dry ingredients are fully mixed and the substance will appear a light brown colour that is a little difficult to mix.

Preheat the oven to 350F.

Pour the mixture into a parchment paper lined 9 X 13 cakepan and make sure that the mixture covers the entire bottem of the pan.

When the oven is ready, put the cakepan into the oven for 25 minutes.

When ready, let the brownies cool and cut after about 10-15 minutes. These are really good cooled but absolutely amazing when still warm.

I would be remiss if I didn't mention how wonderful this old cookbook is. It is now out of print but is titled Kitchen Wizard by Deborah Jarvis. I must thank Ms. Jarvis for introducing me to my love of baking in a fun entertaining way. The book is divided into sections to teach kids how to prepare ingredients such as "Basic Abracadabra", and Tricks of the Trade.

The recipes are divided into fun sections such as A Munchkin Brunch, Lunch in Lilliput, Huckleberry Finn Raft Picnic, A Boston Tea Party, Smugglers Snacks, Dinner with Davy Crocket, and Eskimorsels. All recipes have fun names such as "Flying Monkey Muffins", "Playing Hookey Cookies", and Huckleberry Buckle. My daughter now uses my old Apron and Deborah is now passing this love on to another generation. If anyone ever sees a copy of this in a used book store be sure to pick it up. It's wonderful.

Sunday, May 31, 2009

Vanilla Cupcakes - Cupcake of the Day

Vanilla is a wonderful essence. The scent can be so soothing and relaxing and the flavour of real vanilla is sheer delight.

I often purchase real vanilla pods when I can find them for a reasonable price. I use the seeds in homemade icecream and sometimes cupcakes. The empty pods can then be placed in a small airtight container with some sugar. The flavour of the vanilla will infuse the sugar and can be used for a refreshing change to your morning coffee.

Today we have made traditional Vanilla Cupcakes. As usual I substitute milk for buttermilk. It's low fat and somehow, just makes baking taste better. Most of my recipes can use regular milk, but I will always specify that I have substituted the buttermilk in from the original recipe. You can make your own buttermilk. Take a cup of regular milk, add 1/2 tsp of lemon juice and mix it up. Leave it for about 5 minutes and that will do the job.


Ingredients:
1/2 cup of butter (or margarine)
2/3 cup of granulated sugar
3 large eggs
1 1/2 teaspoons pure Vanilla extract (the original recipe calls for 1 tsp. I like a stronger vanilla flavour)
1 1/2 cups all purpose flour (sifted)
1/4 teaspoon salt
1 1/2 teaspoons baking powder
1/4 cup buttermilk

Mix butter and sugar until a little fluffy. Add the eggs one at a time, mixing well between each egg addition. Continue to mix on med-high speed until fluffy. Add the buttermilk

In a seperate bowl combine the flour, baking powder and salt. Slowly add the flour until well combined. Scrape down the sides of the bowl and give it another little mix. The batter is quite thick.

Take a large spoon and drop into lined muffin cups. This recipe will yield exactly 12 average sized cupcakes. Fill the cupcake liners approx 2/3 of the way up.

Bake in a preheated oven at 350 degrees for approx 23-25 minutes. Check centers with a toothpick after 23 minutes. Remove from oven and let cupcakes cool completely on a baking rack prior to icing.

Buttercream Icing
1/2 cup butter (or butter flavoured Crisco if you desire)
2 cups of icing sugar (confectioners sugar)
1 tsp pure Vanilla
1-2 tablespoons cream (or milk)

Whip the butter and add 1/2 cup of icing sugar. Whip until well combined. Add the vanilla at this point and whip again, scraping the sides of the bowl. Add the remaining icing sugar 1/2 cup at a time (unless you want to end up with white powder all over your kitchen...ha ha), continuing until all the sugar has been added. Continue whipping for approximately one minute. Add the cream and whip again for about 2-3 minutes or until light and fluffy. You can add any food colouring gel to this recipe if desired. Today, teen son chose Lime Green for a colour.

Prepare your icing bag. If you don't have any icing bags use a sandwich bag or freezer bag and simple cut the corner (very small) for an impromptu round tip icing bag.

When the cupcakes are cooled pipe the icing onto the cupcakes any way you wish. This part is great fun for the kids if you want to get them involved in the project.

As mentioned above. I increase the vanilla ration on this one. I also will try this using some seeds from a vanilla pod next time I think and drop the measurement back down to 1 tsp.

It was vanilla day here as we also made Vanilla frozen Yogurt. I pretty much used up all my vanilla pods on that one. The Frozen Yogurt turned out fabulously. It was the first time we made that recipe from "125 Best Ice Cream Recipes" by Marilyn Linton and Tanya Linton. Many of the recipes in there I use as a base but change up the ingredients for more flavourful icecream. We have a Kitchenaid Ice Cream maker bought at (you guessed it), Golda's Kitchens. It's a pretty good machine all things considered for home use.

Saturday, May 30, 2009

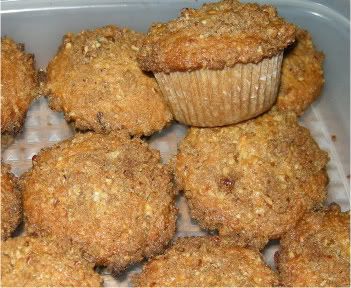
Apple and Oat Crumble Top Muffins


Oat and Apple Crumble-Top Muffins
By Rheanna Kish and The Canadian Living Test Kitchen

These are like apple pie for breakfast, only they're justifiable! Freeze a batch for a good start to any day of the week.
Servings: 12 muffins


Ingredients:
1 cup (250 mL) all-purpose flour
3/4 cup (175 mL)whole wheat flour
3/4 cup (175 mL) quick-cooking rolled oats
1-3/4 tsp (9 mL) baking powder
1 tsp (5 mL) cinnamon
3/4 tsp (4 mL) baking soda
1/4 tsp (1 mL) salt
3/4 cup (175 mL) buttermilk (substituted for regular milk)
3/4 cup (175 mL) vegetable oil
1 egg
2/3 cup (150 mL) packed brown sugar
1 tsp (5 mL)vanilla
1 large apple, peeled, cored and diced

Topping:
1/3 cup (75 mL) packed brown sugar
1/3 cup (75 mL) chopped pecans
1/4 cup (50 mL) whole wheat flour
2 tbsp (25 mL) butter, melted
1 tsp (5 mL) cinnamon

Preparation:
Topping: In bowl, stir sugar, pecans, flour, butter and cinnamon; set aside. In large bowl, whisk all-purpose and whole wheat flours, oats, baking powder, cinnamon, baking soda and salt. In separate bowl, whisk milk, oil, egg, sugar and vanilla; pour over dry ingredients. Sprinkle with apple; stir just to blend.Fill paper-lined or greased muffin cups three-quarters full. Sprinkle with topping. Bake in centre of 375°F (190°C) oven for 25 minutes or until tops are firm to the touch. Let cool in pan on rack for 5 minutes. Remove to rack to let cool completely. (Make-ahead: Store in airtight container for up to 2 days or wrap individually in plastic wrap and freeze in airtight container for up to 2 weeks.)


source: Canadian Living Magazine, November 2007


I tried these over the winter and they were absolutely delicious. The crunchy crumble on the top is a perfect finish to a moist, comforting muffin. If you enjoy apple crisp and apple pie, this recipe is a must.

Friday, May 29, 2009

Red Velvet Cake

I have always been fascinated by this cake, but never tried one..or even tasted one. I have no idea if it's supposed to taste like I made it but it was darned good!!!


Red Velvet Cake:

· 2 1/2 cups (250 grams) sifted cake flour
· 1/2 teaspoon salt
· 2 tablespoon (15 grams) cocoa powder (Dutch processed is preferred but I use regular too)
· 1/2 cup (113 grams) unsalted butter, at room temperature
· 1 1/2 cups (300 grams) granulated white sugar
· 2 large eggs
· 1 teaspoon pure vanilla extract
· 1 cup (240 ml) buttermilk
· 1 tsp of Spectrum Super Red Gel Food colouring. (you can substitute Wiltons dye pastes, or about 2 tablespoons of red food colouring from the grocer)
· 1 teaspoon white distilled vinegar
· 1 teaspoon baking soda
Preheat oven to 350 degrees F (175 degrees C) and place rack in center of oven. Line two 9 inch round pans with Parchment paper, or make sure you generously butter/flour the bottom of the pan. Personally I always use Parchment paper.


In a bowl sift together the flour, salt, and cocoa powder. Set aside.


In bowl an electric mixer, or hand mixer, beat the butter until soft (about 1 minute). Add the sugar and beat until light and fluffy (about 2-3 minutes). Add the eggs, one at a time, beating well after each addition. Scrape down the sides of the bowl. Add the vanilla extract and beat until combined.


In a measuring cup whisk the buttermilk with the red food coloring. With the mixer on low speed, alternately add the flour mixture and buttermilk, in three additions, beginning and ending with the flour.


In a small cup combine the vinegar and baking soda. Allow the mixture to fizz and then quickly fold into the cake batter.


Working quickly divide the batter evenly between the two prepared pans and smooth the tops with a spatula or the back of a spoon. Bake in the preheated oven for approximately 25 - 30 minutes, or until a toothpick inserted in the center of the cakes comes out clean.


Cool the cakes in their pans on a wire rack for 10 minutes. Place a wire rack on top of the cake pan and invert, lifting off the pan. Once the cakes have completely cooled, wrap in plastic and place the cake layers in the fridge for a couple of hours or in the freezer for about ½ hour. This helps when applying the frosting to avoid crumbs. Alternatively you can apply a thin layer of icing then refrigerate and continue frosting over the cool icing.


Cream Cheese Icing.
· ½ tsp vanilla extract
· 2 blocks Philidelphia Cream Cheese (don’t even think about buying low fat version)
· ½ cup butter softened
· approx 2 cups icing sugar. (you need to play with this one a bit to get to your desired consistency)
· ¼ tsp salt
· 1 ½ cups whipping cream
Whip the whipping cream until firm peaks appear. Place into a separate bowl.
Beat cream cheese, butter, salt, together for about a minute. Add the confectioner’s sugar slowly until nice and smooth and the vanilla near the end. Fold the whip cream into the cheese mixture until combined.


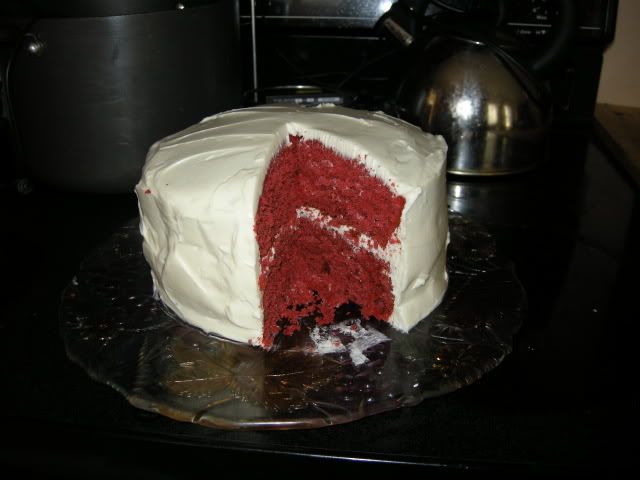
To assemble the cake you have a couple of options. You can use a large bread knife and cut the two layers into four and layer the cake that way or you can simply ice both layers as is. It really depends on how you want to present it. Personally? We use just the two layers. Perhaps if we were entertaining I might make it a thinner four layer cake but we enjoy it as seen in the photo.
Be generous with the icing.


This cake is lovely. I wasn’t sure what to expect the first time I made it. I tweaked a few things and as always substitute buttermilk for regular milk. I just find it makes a richer cake. I’ve always heard of this Red Velvet cake but had never tried it. My family really likes it. I hope you do too. It’s a light tasting chocolate, and very moist.

Related Posts Plugin for WordPress, Blogger...