This is the Horde. Below are our Recipes. Thanks for sharing our Kitchen
Showing posts with label cakes. Show all posts

Friday, June 5, 2009

How to Make a Tree Frog Cake

treefrog cake

The Tree Frog cake became an instant classic in our house (and neighbourhood). I was in heavy cake mode that week. I had agreed to make a grad cake for the school for gr.6 graduation, and my son's birthday was the same week. We did double duty. The grad cake was my first attempt at a multilayer cake and seeing as how I don't have those fancy cake dowels and platform things I had to improvise. I used plastic plates and wooden dowels wrapped in saran wrap. Here is the grad cake. (It's a little lobsided but not bad)

DSCN3861 DSCN3860

The scrolls and hats are made from marshmallow fondant found in This recipe for a ladybug cake.

Using the same hexagon pans we decided to try the Tree Frog cake. My son adores frogs, any frogs but especially tree frogs. He takes sheer delight in catching them at the cottage. I decided for his 12th birthday to make the Tree Frog Cake. I saw some pics of different tree frog cakes online and played with the concepts of what I would do. The inspiration for this one came from one I think I found on the Wilton's Cake decorating forum.

This cake is pretty labour intensive but so worth it if you are looking for some WOW factor or just fun with the kids for a couple of days.

We begin with a basic white cake. Use any recipe you desire. Given the time constraints that week I used box cakes but added a package of pudding to each mix, also replacing the water with buttermilk. I used the Wilton's Medium and extra small hexagon pans for this cake. They come in a set of four, so I used the smallest and the second largest one. Be sure to spray the pans very well with Pam spray before baking to ensure easy release.
DSCN3828 DSCN3825

While the cakes are still a little warm. Slice the tops off the cakes to make a flat surface. Take a jar of apple jelly or apricot jelly and put into the microwave for approx 1-2 minutes or until it has turned to liquid. Be careful removing it as it will be hot. Brush the liquified jelly over the cakes generously to seal the crumbs as well as the moisture in the cake. Let cool completely. I brush the jelly over the entire cake (including underside). Alternatively you can wait until the cake is completely cooled and place a thin layer of buttercream icing over the two cakes, cool for half an hour and finish icing after that. This is all just to seal the crumbs to ensure a nice finish.

This part now you should begin the day ahead. Make the marshmallow fondant linked above. Mold your frog bodies, arms, legs, and eyeballs. Let them dry completely overnight and paint them with food colouring in the morning. I use Spectra food colouring gel. To paint these I take a drop mix in some water and play.

You will also need to roll out your fondant and cut out leaf shapes to paint as well. Often if I need alot of one colour fondant I'll mix some colouring in while I'm making it. Alternatively you can use some ready made fondants. Personally, I'm not a big fan of fondant flavour but the marshmallow one (according to my kids) tastes like oreo cookie cream. It's really easy to work with. Below you see our frog bits in pieces drying on the cookie sheets. I suppose if you were to use ready made you could probably mold/paint and place all on the same day, but this is the route we took.

DSCN3820DSCN3822

Now you are ready for the cake assembly. Ice with your favorite buttercream icing, and ensure you have a little bit left to do the piping for the trees and edges if you desire. Using a regular round tip and icing bag pipe the trees on and add the leaves as you go along.

DSCN3833DSCN3864

Play with your frogs until you find some patterns you like. The nice part of this is you place the arms and legs
wherever you and they will stay with the buttercream below.

DSCN3865DSCN3867

DSCN3870

After it's all finished take lots of pics and wow the kids with this fun creation. Yes it does take time but it's a wicked cool cake. If you do make any of the cakes I’ve written instructions for I’d love to see pics of them. Email them to me and I’ll post them on the blogs.

DSCN3868DSCN3871


DSCN3869

Fish Bowl Cake (with instructions)

DSCN1471

We made this cake for my youngest’s 4th Birthday. It is still one of our favorite cakes of all time and was loads of fun to make with the kids.

First we start with whatever basic cake you’d like to make. I will admit to cheating many times and I use box cakes often. I embellish them a bit to make them more flavourful though. Other items you need to pick up for this project are. Goldfish crackers, Fruit Rollups, Nerds Candies, and dry chow mein noodles, and buttercream icing.

Using a basic Vanilla cake I will add 1 pouch of Jello instant pudding (french vanilla), and substitute the water with buttermilk. The cakes come out a bit denser and very moist. Just follow the directions on the box with the above substitutions and addition.

Trace the bottom of two round 9” cake pans onto parchment paper and cut them out to line the bottom of the pans. be sure to grease the sides of the two pans. Divide the batter evenly into the two pans and bake as directed on the box.

When they are ready, remove from oven and let cool in the pan for 10 minutes. Flip them onto a wire rack and let them completely cool before icing.

DSCN1454

Prepare you icing using a buttercream icing. I used This recipe from Wilton's, for this cake. I prefer the buttercream used in the Vanilla Cupcake Recipe to be honest but either will work fine.

Divide the icing into two parts. Take 1/3 of the white icing out of the mixing bowl and place in a seperate bowl covering until ready to use. Place two drops of Spectra blue food colouring gel into the icing and mix until smooth in colour. Add extra colour until you get the desired shade you are looking for. (Alternatively you can use Wilton’s dye paste, but I prefer Spectra brand)

Once cooled, place cakes on a clean cutting board and slice the raised portion of each cake off to create a flat surface.

DSCN1459

Cut the cakes about 2 inches in on opposite sides of the circles. Place icing onto one cake, smooth it over and place the second cake on top. cut approximately two inches from one side of the cake and about an inch to inch and a half off the opposite side so you end up with something that looks like this.

DSCN1460 The Longer flat side will be the bottom and the shorter side the top. Spread icing along the longer “bottom” side and place upright onto a round smooth cake plate.

DSCN1461

Continue use the blue icing around the cake to end up with the above result. Take your white icing sugar and smooth over the remaining cake. Remember only to use a thin layer of both at this point. Place in the fridge for about 1/2 hour to cool. Once nice and cool, place a thicker layer of each icing colour in the appropriate locations. The first thin layer and cooling allows for a top coat of smooth icing avoiding those pesky crumbs on the top layer.

DSCN1462

Here is the top layers now. If you have an icing bag, Fill it with the remaining white icing. Without using any tip pipe a large round oval on the top of the cake to create the cake rim. Fill with blue sprinkle sugar. If you don’t have an icing bag place some of the white icing into one cut the corner to create the same effect.

Now comes the fun part. Take the fruit roll ups out and find the green ones. Cut shapes of seaweed out of the rollups. What I do is use a paring knife to make the shapes then peel them off as needed. The kids like this part. Place the seaweed around the cake wherever you feel like it.

DSCN1464

Continue embeleshing the cake until you achieve your desires results with seaweed. Use the nerds along the base for pebbles, Chow mein noodles for added affect (my brain is dead and can’t remember what seaweed the chow mein noodles represent).

DSCN1465

When you are happy with your base you can start adding goldfish. For extra fun we used a small tip in the icing bag and made eyes, air bubbles in the tank etc.

DSCN1467 DSCN1466

The finished fish bowl with some writing and such added to the plate.

DSCN1470

DSCN1471

There you go!! Get the kids involved (or not) and have fun with it.

Friday, May 29, 2009

Red Velvet Cake

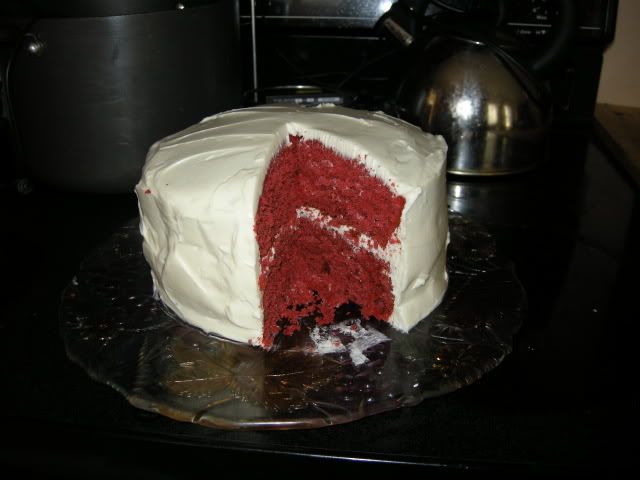
I have always been fascinated by this cake, but never tried one..or even tasted one. I have no idea if it's supposed to taste like I made it but it was darned good!!!


Red Velvet Cake:

· 2 1/2 cups (250 grams) sifted cake flour
· 1/2 teaspoon salt
· 2 tablespoon (15 grams) cocoa powder (Dutch processed is preferred but I use regular too)
· 1/2 cup (113 grams) unsalted butter, at room temperature
· 1 1/2 cups (300 grams) granulated white sugar
· 2 large eggs
· 1 teaspoon pure vanilla extract
· 1 cup (240 ml) buttermilk
· 1 tsp of Spectrum Super Red Gel Food colouring. (you can substitute Wiltons dye pastes, or about 2 tablespoons of red food colouring from the grocer)
· 1 teaspoon white distilled vinegar
· 1 teaspoon baking soda
Preheat oven to 350 degrees F (175 degrees C) and place rack in center of oven. Line two 9 inch round pans with Parchment paper, or make sure you generously butter/flour the bottom of the pan. Personally I always use Parchment paper.


In a bowl sift together the flour, salt, and cocoa powder. Set aside.


In bowl an electric mixer, or hand mixer, beat the butter until soft (about 1 minute). Add the sugar and beat until light and fluffy (about 2-3 minutes). Add the eggs, one at a time, beating well after each addition. Scrape down the sides of the bowl. Add the vanilla extract and beat until combined.


In a measuring cup whisk the buttermilk with the red food coloring. With the mixer on low speed, alternately add the flour mixture and buttermilk, in three additions, beginning and ending with the flour.


In a small cup combine the vinegar and baking soda. Allow the mixture to fizz and then quickly fold into the cake batter.


Working quickly divide the batter evenly between the two prepared pans and smooth the tops with a spatula or the back of a spoon. Bake in the preheated oven for approximately 25 - 30 minutes, or until a toothpick inserted in the center of the cakes comes out clean.


Cool the cakes in their pans on a wire rack for 10 minutes. Place a wire rack on top of the cake pan and invert, lifting off the pan. Once the cakes have completely cooled, wrap in plastic and place the cake layers in the fridge for a couple of hours or in the freezer for about ½ hour. This helps when applying the frosting to avoid crumbs. Alternatively you can apply a thin layer of icing then refrigerate and continue frosting over the cool icing.


Cream Cheese Icing.
· ½ tsp vanilla extract
· 2 blocks Philidelphia Cream Cheese (don’t even think about buying low fat version)
· ½ cup butter softened
· approx 2 cups icing sugar. (you need to play with this one a bit to get to your desired consistency)
· ¼ tsp salt
· 1 ½ cups whipping cream
Whip the whipping cream until firm peaks appear. Place into a separate bowl.
Beat cream cheese, butter, salt, together for about a minute. Add the confectioner’s sugar slowly until nice and smooth and the vanilla near the end. Fold the whip cream into the cheese mixture until combined.


To assemble the cake you have a couple of options. You can use a large bread knife and cut the two layers into four and layer the cake that way or you can simply ice both layers as is. It really depends on how you want to present it. Personally? We use just the two layers. Perhaps if we were entertaining I might make it a thinner four layer cake but we enjoy it as seen in the photo.
Be generous with the icing.


This cake is lovely. I wasn’t sure what to expect the first time I made it. I tweaked a few things and as always substitute buttermilk for regular milk. I just find it makes a richer cake. I’ve always heard of this Red Velvet cake but had never tried it. My family really likes it. I hope you do too. It’s a light tasting chocolate, and very moist.

Thursday, May 28, 2009

How to make a LadyBug Cake

We made this cake for my Daughter's 8th Birthday. Her class had just finished a rousing performance of "Going Buggy" and she was the kidnapped Ladybug. She wowed her dad and I (who thought she was tone deaf to be honest) with a spectacular solo, belting out "that's no way to treat a ladybug" complete with the required "Don't mess with this gal" attitude. She brought tears to my eyes, not only in pride but also because I forgot the video camera...I have "part" of her performance thanks to a neighbour.

In honour of this we decided on a ladybug cake for her class. It was a hit and was really quite simple to make

Okay...here ya go. HAVE FUN!!!!!

The icing is just a simple buttercream. 1/2 cup butter, 1/2 cup shortening, 4 cups of icing sugar, 1 tsp vanilla. Whip the butter, shortening, add one cup of icing sugar, whip again, add vanilla, whip, add icing sugar one cup at a time. Add a tablespoon of milk at a time to get a good consistency. I also add about 2 tblsp of clear corn syrop to help with consistency before adding the milk.


9 x 13 pan for leaf

Pans for the round body of ladybug (ended up with an extra one...the kids enjoyed it)

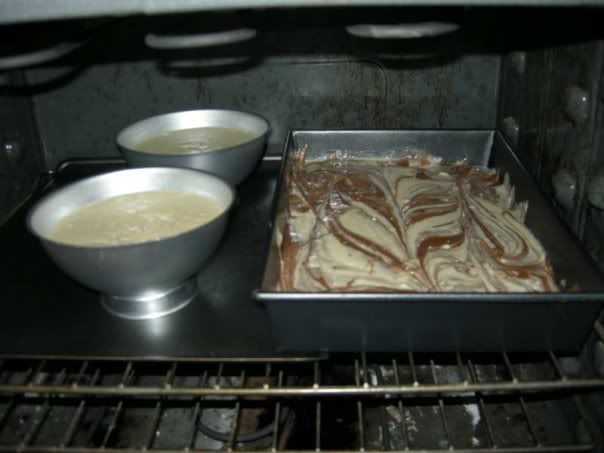
Baking (please ignore the dirty oven). Most of the pans I use are Wilton's and my favorite Baking Store...Golda's Kitchens.


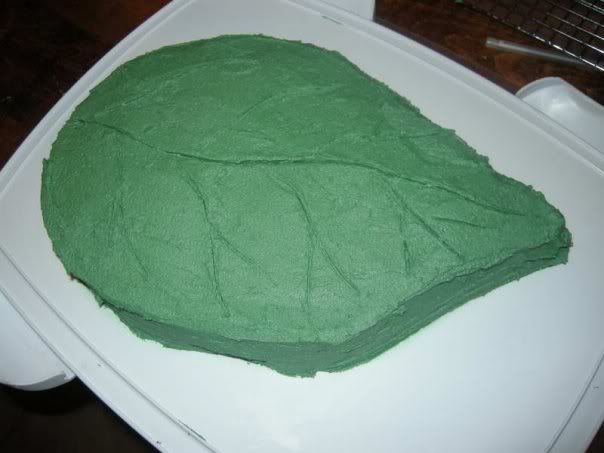
Leaf cut out and iced. TIP: You can do two things to avoid the crumbs in the icing.

One: do a thin layer of icing with crumbs in it. Put in fridge for awhile until it gets harder then ice on top of it
Two: Take a jar of apricot or apple JELLY (not jam), nuke it until it's liquidy and brush it over the cakes. Let cool for about 1/2 hour in the fridge and you'll get no crumbs. It also helps to adhere the icing to the cake


Photobucket

Ladybug body done. Transfer onto leaf with a spatula

Photobucket

Body added. I made the head with an extra piece of cake, iced it and added. I filled in spots I missed with icing from a bag to avoid crumbs


Photobucket

Polka dots and such added with an icing bag. (if you don't have one you can always use a ziploc bag and cut a very small hole in the corner to make a tip.

Photobucket

Final embellishments. Little lady bugs made of marshmallow fondant. I'll type up the recipe for you. (easy peasy and it tastes like the inside of an oreo cookie) These are stuck on with toothpicks


For Fondant icing.
This one is a little trickier but after you make it once it's pretty easy. It molds like playdoh and rolls out super thin. It's paintable with food colouring and the possibilities are endless.

Here is the recipe I use. THis is a copy of a post in a cake decorating forum that I go to for ideas. Bunnywoman was the originator of this recipe.
The recipe is as follows:

Marshmallow fondant
1 cup mini marshmallows
1 tbsp water
1 1/2- 1 3/4 cup powder sugar

Place marshmallows in a standard 1 cup measuring cup and push down and pack them in. Place in a microwave safe bowl and add the water. Put in the microwave for about 20 seconds. Just long enough for them to soften and puff up. Take out and stir with a spoon until it is combined well. At this point it looks kind of soupy. Then add the sugar and mix and fold until all is incorporated and it is no longer sticky. I take it out of the bowl when it gets to the point where most of the sugar is incorporated and I knead it in my hands. This takes roughly about 5-7 minutes. Take a fondant roller or a regular rolling pin and roll out just as you would Wilton's fondant. You can get this fondant almost paper thin and it also repairs well. It's cheap, easy to work with, and tastes great too.

You can make a large batch of this fondant as well by doing this:

Large batch of Marshmallow fondant
1- 16 oz bag of mini marshmallows
2 tbsps water
2 lbs powdered sugar (8 cups)

Do the same procedure as above.


Tips for success from Bunny:
I add any flavor Lorann Oil flavorings to this. Something that will compliment my cake well. What I do is cut back on the water and add about 1/8 tsp Lorann flavoring. You can certainly add more (especially if I make the large batch) for a more of a pungent flavor, just adjust the water amount accordingly. *****The more liquid you add to this will make it stickier to work with. Try to be accurate in measuring the liquid.*****

Stickiness??????
If it is way to sticky to work with then cut back on the amount of liquid that you used by about 1/2 tsp. This will help.
Let it sit out and "air dry" for about 10 minutes.
Use a small amount of Crisco on your work surface and hands. A little goes a very long ways so don't go over board with the Crisco.

Knead the dough with a spoon!!!!! Do not attempt to pick it up and knead it too soon. This dough is hot when comes right out of the microwave!!!!! I say this because I have had people contact me saying they received a burn from it. I can almost knead it fully with a spoon.

Dough that is not in use must stay covered with plastic wrap or it will dry out. Or place it in a Ziploc bag. That works too.

Dried out Marshmallow fondant: place it back into the microwave and nuke it for a few seconds to revive it back to its original state. The bigger the batch the more time on the microwave. Example: small batch 3-5 seconds.......large batch about 10 seconds. Microwaves vary too so keep that in mind.

Coloring: well I have experimented with this several different ways. If I want to make the whole batch of Marshmallow fondant one color then I have added the color, just Wilton paste color, Americolors, or Chefmaster colors.....any will work for this, when I pull the bowl out of the microwave when it looks "soupy". Stirred it up and then added the powdered sugar. Otherwise I have added it after it has come together and kneaded it in by hand. I use plastic gloves too when I do this, because otherwise your hands are never the same!!!!

You can work with this just as you would the regular fondant. Pizza rollers cut this very well. Ribbon cutters work fabulous too for this. I can make bows and drapes, push molds etc with this. I love the taste of this stuff. Great on the pocketbook too!!!!!!


Happy Decorating!

OH...wanted to add...for the marshmallow fondant. I made the last batch using the kitchenaid mixer to get it mostly mixed then kneaded it until smooth. Worked like a charm.

I will confess sometimes I cheat and use boxed cakes. I substitute Buttermilk for water in all box recipes
Related Posts Plugin for WordPress, Blogger...